
Welcome to the Ultimate T-Shirt Design Placement Guide, your comprehensive resource for creating visually appealing and professional designs. Learn proper measurements, placement tips, and best practices to ensure your designs look their best on any shirt type. This guide covers everything from chest and sleeve placements to avoiding common mistakes, helping both beginners and experienced designers achieve flawless results; Master the art of T-shirt design placement with expert advice and practical tips tailored for all skill levels.
Standard Design Placement Measurements
Standard measurements ensure designs are proportionate and visually appealing. Place designs 3 inches below the neckline and 2 inches from the armpit for balanced placement. Adult designs typically range from 8 to 10 inches in width, centered for a polished look.
2.1 Front Chest Design Placement
For a polished look, place front chest designs 3 inches below the neckline and 2 inches from the armpit. This ensures the design is centered and proportional. Adult designs should be 8 to 10 inches wide, while youth designs are slightly smaller. Proper alignment avoids common mistakes like designs appearing too high or off-center, ensuring a professional and visually appealing finish on any shirt type.
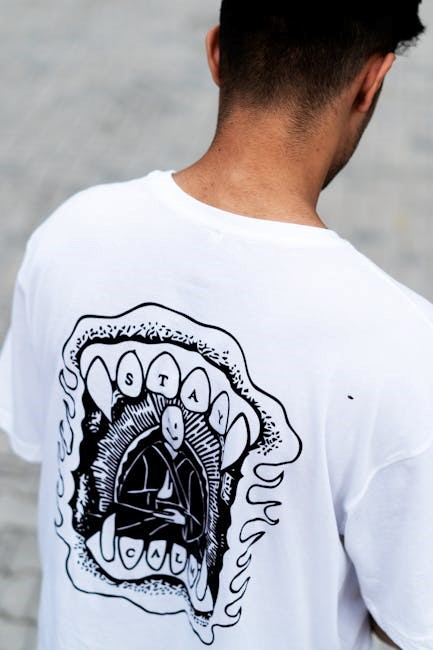
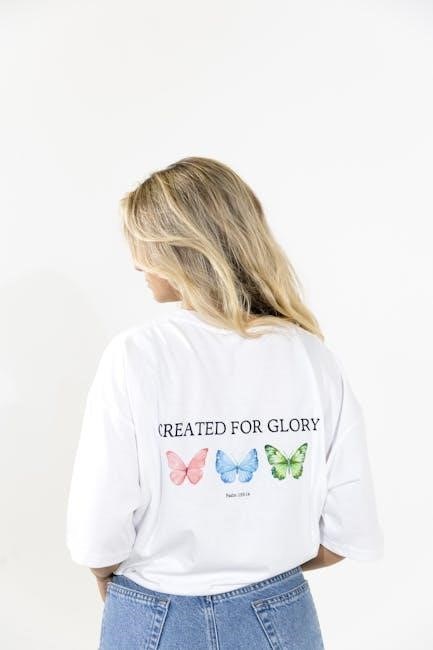
2.2 Back Design Placement
Back designs typically range from 6 to 9 inches below the collar seam, centered between the shoulder seams. Ensure the design is proportional to the shirt size, avoiding placement too low or off-center. For a balanced look, the design should align symmetrically across the upper back, leaving enough space above the waistline. Proper alignment ensures a professional and visually appealing finish on any shirt type or fabric.
2.3 Sleeve Design Placement
For sleeve designs, place graphics or text 3 to 5 inches below the shoulder seam, centered vertically. Keep designs smaller, typically 3 to 5 inches wide, to avoid wrapping excessively around the sleeve. Ensure the design is balanced and doesn’t extend too far down, as this can cause distortion when the arm bends. Centering the design vertically ensures a clean, professional appearance on any sleeve type or length.
Design Size Chart for T-Shirts
Adult designs typically range from 8 to 10 inches wide, placed 4 inches below the collar. Youth designs are slightly smaller, around 7 to 9 inches wide, positioned similarly for balance.
3.1 Adult Shirt Design Dimensions
Adult shirt designs typically range from 8 to 10 inches wide for a balanced look. Place designs 4 inches below the collar for optimal visibility. Ensure the design is centered and proportional to the shirt size, avoiding excessive scaling. This size ensures readability and visual appeal, making it suitable for both casual and professional designs.
3.2 Youth Shirt Design Dimensions
For youth shirts, designs are typically smaller, ranging from 7 to 9 inches wide. Place designs 3 to 4 inches below the collar for a balanced look. The height should be proportional, around 5 to 7 inches tall, ensuring the design is centered and not oversized. This size ensures comfort and visibility, making it ideal for younger audiences while maintaining a professional appearance.
Placement by T-Shirt Type
Explore tailored design placement strategies for different T-shirt styles, including crew neck, V-neck, scoop neck, and sleeveless. Each style requires unique considerations for optimal visual appeal and functionality.
4.1 Crew Neck T-Shirt Placement
For crew neck T-shirts, place designs 3 inches below the neckline and 2 inches from the armpit for a balanced look. Center the design horizontally, aligning it with the shirt’s center. Keep the width between 8-10 inches for adult sizes. This placement ensures visibility and comfort, making it ideal for logos or graphics. Proper alignment enhances professionalism and appeal.
4.2 V-Neck T-Shirt Placement
For V-Neck T-shirts, place designs 3 inches below the neckline, aligning with the center. The design should sit proportionally to the V-shape, avoiding distortion. Keep the width between 8-10 inches for adult sizes. This placement ensures the design complements the shirt’s unique neckline, creating a balanced and visually appealing look while maintaining comfort and professionalism.
4.3 Scoop Neck T-Shirt Placement
For scoop neck T-shirts, place designs 3 inches below the neckline, centered for a balanced look. The design width should be 8-10 inches for adults, ensuring it aligns proportionally with the scoop. Avoid placing designs too close to the seam. This placement complements the shirt’s curved neckline, offering a modern and visually appealing aesthetic while maintaining comfort and style.
4.4 Sleeveless T-Shirt Placement
For sleeveless T-shirts, place designs slightly lower than on sleeved shirts, around 4-5 inches below the neckline. Center the design to ensure symmetry and balance. The width should be between 8-10 inches for adult shirts. Avoid placing designs too close to the armholes to maintain a clean, polished appearance. Test designs on samples to ensure accurate placement and visual appeal.
Tips for Optimal Design Placement
Ensure designs are balanced and visually appealing by centering them and avoiding excessive spacing. Measure from the neckline for accurate placement, and use tools to maintain symmetry. Test designs on samples to confirm proper alignment and proportions before final production. This ensures a polished, professional finish for all T-shirt designs.
5.1 Centering Designs
Centering designs ensures a professional and balanced look. Measure from the neckline to determine the center point, ensuring symmetry. Use tools like rulers or templates to align designs perfectly. For adult shirts, center designs 4-6 inches below the collar, aligning with the chest area. Test designs on samples to confirm proper alignment and proportions. This step ensures a polished, visually appealing finish for all T-shirt designs.
5.2 Avoiding Common Placement Mistakes
Prevent designs from appearing misplaced by avoiding common errors. Ensure designs aren’t too high or low, as this disrupts balance. Always measure from the neckline and armpit seams for accurate placement. Test designs on samples to verify alignment and proportions. Off-center designs can make the shirt look unprofessional, so double-check symmetry. Proper alignment ensures a polished, visually appealing result for all T-shirt designs.
Tools and Resources for Precise Placement
Use measuring tools like rulers or calipers for accurate placement. Software such as Adobe Illustrator and Photoshop help visualize designs on shirts. Templates and guides ensure symmetry and alignment for professional results.
6.1 Measuring Tools
Accurate measuring tools are essential for precise design placement. Use rulers, calipers, or measuring tapes to ensure designs align perfectly with seams and edges. A flexible measuring tape is ideal for curved areas like sleeves. Digital calipers provide exact measurements for small details, while rulers help measure straight distances. These tools ensure consistency and professionalism in your T-shirt designs.
6.2 Software for Design Placement
Utilize specialized software like Adobe Illustrator or Photoshop for precise design placement. Tools like CorelDRAW and Canva offer templates and alignment guides to help position designs accurately. These programs allow you to visualize how designs will look on different shirt types and ensure proper scaling. They also support layering and measurement tools, making it easier to achieve professional-level placement for any T-shirt design project.
Common Mistakes in Design Placement
Avoid placing designs too high or low, as this can make the shirt look unbalanced. Ensure designs are centered and properly scaled for the shirt size to maintain a professional appearance.
7.1 Designs Too High or Too Low
Placing designs too high or low can disrupt the shirt’s balance and visual appeal. Ensure designs are 3-4 inches below the neckline for a polished look. Avoid placements that extend beyond the armpit seam, as this can make the design appear misplaced. Use measuring tools to maintain consistency and test designs on samples to prevent errors. Proper alignment ensures a professional finish.
7.2 Off-Center Designs
Off-center designs can significantly detract from the overall aesthetic. Always ensure designs are centered between the shoulders and aligned with the shirt’s seams. Use a ruler or template to double-check placement. Uneven designs can make the shirt look unprofessional. Record measurements and test designs on samples to maintain accuracy and achieve a balanced, visually appealing result every time.
Best Practices for Professional Results
For professional results, ensure designs are balanced and proportional. Use consistent sizing across orders and align graphics with seams. Avoid clutter by balancing text and visuals effectively.
- Balance text and graphics for a clean, polished look.
- Consistency is key for a professional finish.
8.1 Consistency Across Designs
Consistency is crucial for a cohesive brand identity. Ensure all designs maintain proportional sizing and alignment across different shirt sizes and types. Use templates to standardize measurements and placement, guaranteeing a uniform look. This approach simplifies production and enhances professionalism, making your designs instantly recognizable and visually appealing to customers.
- Maintain proportional sizing across all shirt sizes.
- Use templates for accurate design placement every time.
- Test designs on samples to ensure consistency.
8.2 Balancing Text and Graphics
Balancing text and graphics ensures a visually appealing design. Avoid overcrowding by keeping text concise and graphics proportionate. Place text near the collar for focus, with graphics below for harmony. Symmetry enhances readability, while contrasting colors or styles add depth. Maintain simplicity to prevent clutter and ensure the design remains professional and eye-catching. Proper balance creates a polished, cohesive look for any T-shirt design.
- Symmetry enhances visual appeal.
- Contrast adds depth to designs.
- Keep text simple for readability.
Future Trends in T-Shirt Design Placement
Explore emerging trends in T-shirt design placement, including asymmetrical designs and minimalist layouts. These styles offer fresh, modern aesthetics, enhancing visual appeal while maintaining simplicity and functionality for all shirt types.
9.1 Asymmetrical Designs
Asymmetrical designs are gaining popularity, offering a fresh alternative to traditional symmetrical layouts. By placing graphics off-center or at unique angles, these designs create dynamic visual interest. They work well on various shirt types, including crew necks and scoop necks, and are ideal for modern, edgy aesthetics. This trend challenges conventional design norms, allowing for creative freedom while maintaining balance and appeal.
9.2 Minimalist Placement
Minimalist placement emphasizes simplicity and clean aesthetics, focusing on smaller designs centered on the chest or sleeve. This trend avoids clutter, ensuring designs are subtle yet impactful. Ideal for modern styles, minimalist placement typically features designs measuring 3-4 inches wide, positioned 4-5 inches below the neckline. It creates a balanced, sophisticated look, perfect for understated branding or delicate artwork, appealing to those who prefer timeless elegance over bold statements.
Mastering T-shirt design placement ensures professional results. By following size charts, avoiding common mistakes, and balancing elements, you can create visually appealing designs that stand out and resonate with your audience. Practice and experimentation will refine your skills, helping you achieve flawless placement every time. Happy designing!
10.1 Final Thoughts
Proper T-shirt design placement is crucial for a polished, professional look. By following size charts, avoiding common mistakes, and balancing text with graphics, you ensure your designs stand out. Consistency across different shirt types and fabrics is key to achieving a cohesive appearance. Whether for personal projects or client work, these guidelines will help you create visually appealing designs that resonate with your audience and leave a lasting impression.
10.2 Resources for Further Learning
For further exploration, check out comprehensive design placement guides and tutorials online. Websites like YouTube offer video tutorials, while blogs provide detailed step-by-step instructions. Additionally, join design communities or forums to learn from experts and gain insights into the latest trends. These resources will help you refine your skills and stay updated on best practices in T-shirt design placement.
Frequently Asked Questions
Discover answers to common questions about T-shirt design placement, including measurements, tips, and best practices. Learn how to avoid mistakes and achieve professional results with ease.
11.1 How to Measure Design Placement
To measure design placement accurately, start by identifying key landmarks like the neckline, armpits, and shoulder seams. Use a ruler or measuring tape to mark distances. For chest designs, measure 3-4 inches below the neckline and 2 inches from the armpit. Record these measurements to ensure consistency across designs. This method ensures your artwork is centered and proportionally placed for a polished look.
11.2 Best Practices for Different Fabrics
When working with various fabrics, consider their stretch and texture. For cotton, use standard measurements, while stretchy fabrics like polyester blends may require slightly adjusted placement. Heavy fabrics benefit from larger designs, while lightweight ones suit smaller graphics. Always ensure the design aligns with the fabric’s grain to avoid distortion. Test designs on fabric samples for optimal results and adjust placement based on material characteristics.

Final Tips for Perfect Placement
Ensure consistency by recording measurements and testing designs on samples. Use tools like rulers and software for accuracy. Always preview designs on actual garments before printing for the best results.
12.1 Record Measurements
Recording measurements ensures consistency and accuracy in design placement. Use a spreadsheet or template to document dimensions for chest, sleeve, and back designs. Include photos of samples for visual reference. This helps maintain professionalism and saves time during production. Regularly update records for different shirt types and sizes to ensure precise placement every time.
12.2 Test Designs on Samples
Testing designs on sample shirts ensures optimal placement and appearance. Print your design on fabric to verify size, alignment, and visibility. Use measuring tools to check dimensions and adjust as needed. This step helps identify and correct issues before production, ensuring a polished and professional final product. It’s a crucial process for perfecting your design placement every time.

Additional Resources
Explore our curated list of additional resources for mastering T-shirt design placement. Discover detailed guides, tutorials, and tools to enhance your skills. Visit reputable websites offering design templates, measurement charts, and expert tips. Join online communities and forums to share ideas and learn from professionals. These resources provide endless inspiration and practical advice for perfecting your designs.